Certifying caregivers, coaches, doctors, laypeople, nurses and teachers worldwide!

  • Flexible
  • Convenient
  • Trusted

The CPR Certification Course

The CPR Certification Course


What would you do if you had to save a life?  Would you know where to begin? 

According to doctors, sudden cardiac arrest is a leading cause of death in America. After the human heart stops functioning, the brain can only survive for up to four minutes without oxygen. Unfortunately, it can take 6-10 minutes for EMS to respond. This is a prime example of why learning CPR and how to use an AED is important. During that time, performing CPR correctly will help oxygenated blood flow to the victim's heart and brain. This greatly increases the victim's chance for survival. Almost anyone can learn CPR, so it has proven to be a very valuable, lifesaving technique.

Let's get started and let's begin with the CPR basics!
 

CPR Basics

When we breathe air, it goes into our lungs. Our blood receives oxygen which is pumped into our tissues and organs by the heart. During cardiac arrest, the heart changes from its normal beating pattern to an arrhythmic pattern. This unusual pattern is referred to as ventricular fibrillation and the heart eventually stops beating.

When this happens to the human heart, oxygen cannot circulate through the body and this quickly kills cells and tissues. Fortunately, Cardio (heart) Pulmonary (lung) Resuscitation (revive or revitalize) helps the victim because it serves as an artificial heartbeat and respirator until the heart either starts beating normally on its own or medical help arrives.

Performing CPR properly doesn't always save the victim. However, if it is started within four minutes of cardiac arrest and if defibrillation begins within ten minutes, it is estimated that the victim has a 40% chance of surviving the traumatic events.

   
CPR was developed in the 1960's to allow almost anyone to sustain life during the critical, first minutes of cardiac arrest. This lifesaving technique gives oxygenated blood to the victim's heart and brain, so the vital organs stay alive until EMS arrives.

In order to remember the CPR system, an acronym was developed that makes remembering it easy (as simple as knowing your A, B, Cs!)

  • Airway
  • Breathing
  • Circulation

Before teaching you the application of these A, B, Cs, we'll begin by emphasizing the first step of Basic Life Support (BLS).

Basic Life Support

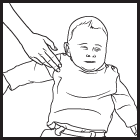
Remember to call 911! It may be the most important thing you can do to save a life!

When someone else is present (e.g. someone who doesn't know CPR), ask them to call 911 immediately. If nobody else is present and you and the victim are alone, try calling for help before starting CPR on an adult or after one minute on a child. In an emergency, it's important to know what to do and what not to do. Here are some things that you should never do.

Do not . . .

  • Leave the victim.
  • Try to make the victim drink water.
  • Throw water on the victim's face.
  • Have the victim sit up.
  • Try to revive the victim by slapping his face.
  After you dial 911, provide the operator with:
1. Your location (e.g. street name, city, etc.)
2. Your telephone number (e.g. cell phone or home phone)
3. The type of emergency (e.g. what you witnessed, what is happening, etc.)
4. The victim's current condition


Always remember to think clearly and use your best judgment!

During an emergency, some people act inappropriately or even put themselves in danger. After you determine the scene is safe, approach the victim and be prepared to administer CPR. Please don't forget to check for potential danger that could effect you and the victim!


AIRWAY

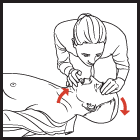
The letter "A" stands for AIRWAY. When a victim is unconscious and unresponsive, check his airway to make sure there are no obstructions. The victim's breaths might be faint and shallow, so be careful when you look, listen, and feel for his breathing. If you find the victim has stopped breathing, he might have an airway obstruction. The tongue is the most common airway obstruction, but many other things can obstruct the airway too.

While the victim is lying on his back, gently tilt his head backwards. You can do this by putting one hand on his forehead and the other hand under his chin. This position causes the tongue to move and clear the airway. However, if the victim still isn't breathing, you'll need to help him breathe.


Tilt the head and open the victim's airway


Tilt the head and open the victim's airway.

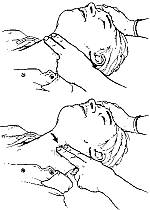
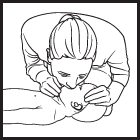
BREATHING

The letter "B" is for BREATHING. After clearing the victim's airway, keep the victim's head titled back and pinch his nose. This will prevent air from escaping as you place your mouth over the victim's and begin ventilating.

Watch the victim's chest as you give him air. Avoid overinflating his lungs as this will force air into his stomach, which could result in vomiting. If the victim vomits, simply turn his head to one side and carefully use your finger to sweep any new obstructions away before continuing.

At this time, you need to give the victim two full breaths. After each breath, give his lungs time to exhale and relax. If you put your ear near his mouth and listen, you may hear air escaping. While you do this, watch the victim's chest and it should fall as his body exhales.

After these breaths, if the victim does not become responsive (e.g. if there is no breathing, moving, coughing, etc.), then you need to check his circulation.

Give two breaths and let the victim exhale

Give two breaths and let the victim exhale.


CIRCULATION

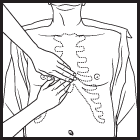
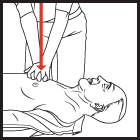
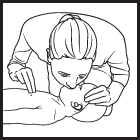
The letter "C"in the A-B-C acronym is for CIRCULATION. Check and see if the victim's heart is beating by locating the carotid artery. Use two fingers and put them on the victim's neck like it shows in the picture to the right. Find the middle of the neck (where the Adam's Apple is located on men) and slide your fingers to the side of the his neck and feel for a pulse.

If the victim has no pulse, it means his heart is not beating. This is when you should perform chest compressions. Please continue to the next section.

Locate the carotid artery and feel for a pulse

CHEST COMPRESSIONS

When you perform chest compressions, make sure your hands are in the right place. See the picture on the right. You'll need to place two fingers on the sternum (where the lower ribs come together) and put the lower palm of your hand next to your fingers.

At this time, you must put one hand on top of the other (as shown in the moving graphic to the right). Keep your arms straight and use the weight of your body to compress the victim's chest. These compressions should be about 1.5 to 2 inches deep. Remember the saying, "2 hands, 2 inches" for adults and "1 hand, 1 inch" for children. Don't worry too much if you hear cracking sounds, but be careful not to push too hard. It's common for cartilage to break during CPR, but this consequence is far more desirable than a lost life! Continue chest compressions and take a little of the pressure off.

As you compress the victim's chest approximately 30 times (at the rate of about 3 compressions every 2 seconds), could the compressions out loud. This will help you to remember how many you have given and it will help you get into a good rhythm. Finish by giving the victim 2 breaths of air. Perform the process of 30 compressions and 2 breaths four times. When you're done, check the victim's pulse to see if he is conscious. If the victim still has no pulse, then continue this procedure until help arrives. When you feel a pulse, you know the victim's heart is beating. However, if he still isn't breathing, then you must administer rescue breaths. Give the victim one rescue breath every 5 seconds, but don't forget to pinch the nose, so air doesn't escape.


Locate the sternum

Locate the sternum, use proper hand placement, and use two hands and two inches.

Give chest compressions to the victim

Give chest compressions to the victim.

 
Review

During an emergency, you may be the victim's only chance for survival. Remember that you can increase his chance for survival by 40% if you effectively perform CPR (Cardio Pulmonary Resuscitation).

1. See if the victim is responsive by shaking the him and speaking to him. Call him by name if you know his name and even shout to see if he will respond. Never move the victim or shake him if there is a chance he has suffered a spinal cord or neck injury.

2. Call 911.

3. Remember your A, B, Cs!

  • Airway: Clear the victim's airway by tilting his head back and lifting his neck.

  • Breathing: Pinch the victim's nose and give him 2 breaths of air. Look at his chest to see if it rises with each breath.

  • Circulation: If the victim still has no pulse, then administer 15 chest compressions - remember 2 hands, 2 inches for adults and 1 hand, 1 inch for children.

4. Check the victim for a pulse. If there isn't one, then perform the cycle again until help comes.


Infant CPR

Here are the steps for giving CPR to an infant.


Infant CPR - Step 1


1. Shout and Tap

Shout and gently tap the child on the shoulder. If there is no response, position the infant on his or her back.


Infant CPR - Step 2


2. Open the Airway

Open the airway using a head tilt, lifting the chin. Do not tilt the head too far back.


Infant CPR - Step 3


3. Give 2 Gentle Breaths

If the baby is NOT breathing give 2 small, gentle breaths. Cover the baby's mouth and nose with your mouth. Each breath should be 1 second long. You should see the baby's chest rise with each breath.


Infant CPR - Step 4


4. Give 30 Chest Compressions

Give 30 gentle chest compressions at the rate of 100 per minute. Use two or three fingers in the center of the chest, just below the nipples. Press down approximately one third the depth of the victim's chest.


5. Repeat

Repeat with 2 breaths and 30 compressions. After two minutes of repeated cycles, call 911 and continue giving breaths and chest compressions.
 

CPR Videos

We have two free CPR videos that you can view. Click here for our infant video and click here for our adult video. Both videos are approximately 1 minute long and they will open in a new window and this CPR course will remain under it.
 

Using an AED


An AED (Automated External Defibrillator)

When appropriate, ask someone to call 911 and look around the victim's area for an AED (Automated External Defibrillator) like the one above. If you cannot locate an AED, begin CPR. Employees in public areas like bus terminals and airports should be able to give instructions and contact emergency response units who can help give CPR and defibrillate the victim.

In order to use an AED, follow these steps:

1. Turn on the AED unit. Depending on the type of AED you may have to push the on button or pull a handle to start the device.

2. The AED will give you voice or text prompts. Listen to them (or read them) and follow them.

3. Whether the victim is male or female, you must remove all clothing from their arms, abdomen and chest.

4. Peel off the pads and place them precisely as shown. Accuracy and speed are both very important.

5. The AED should analyze the victim's heart rhythm. However, you may have to push a button for it to begin. Do not touch the victim during this procedure.

6. Push the button when the AED prompts you to shock the victim. When you administer the shock, make sure nobody is touching the victim. Furthermore, he or she must be dry (a little sweat is fine) and must not be touching any metal. If the victim has a pacemaker device, avoid placing the shock pads on it.

7. The AED will shock up to three times. Typically, just one shock is needed. Some AED units will shock only once on the greatest shock setting, then they will prompt you to administer two minutes of CPR to the victim.

8. When a victim has no pulse, defibrillation may be inadvisable. When the AED does not recommend a shock, check the victim's pulse. If there is no pulse, then continue administering CPR.

Note: If the victim is on a metal surface and cannot be moved, you may place a mat under him or her before using an AED.
 

Quiz

Congratulations! You've finished our online CPR and AED course. The following quiz will help you recall the most important concepts in this course. Please write your answers on a piece of paper, so you can check them against the answers on the next page.  Good luck!

1. Check the victim's responsiveness by:

A. Looking at their hands
B. Propping up their head
C. Shaking them and saying, "Are you okay?"
D. All of the above

2. If the victim stays unresponsive, you need to:

A. Look through their wallet for ID
B. Begin CPR, then call 911
C. Call 911 before you begin CPR
D. None of the above

3. Check the victim's breathing by:

A. Feeling for exhaled air
B. Watching for their chest to rise and fall
C. Listening closely for exhaled air
D. All of the above
 
4. ___________ is the most typical airway obstruction.

A. The teeth
B. The tongue
C. Food
D. None of the above

5. In order to clear the victim's airway:

A. Lift up the chin and tilt the head back
B. Lift the victim's chin and turn their head to the side
C. Push down the chin and do not touch the victim's head
D. None of the above

6. The best place to feel for the victim's pulse is at the:

A. Chest
B. Back of the hand
C. Carotid artery
D. The forehead

7. When you help the victim breathe:

A. Pinch the victim's nose closed, so air does not escape
B. Feed the victim first
C. Make sure their feet are above their head
D. All of the above

8. When you give chest
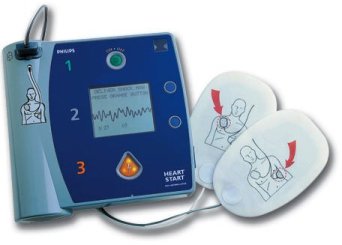
 compressions:

A. Put your hands on the victim's sternum
B. Apply the "1 hand, 1 inch" rule for children
C. Apply the "2 hands, 2 inches" rule for adults
D. All of the above

9. Never place an AED on:

A. A wet victim
B. A victim who's touching metal
C. A pacemaker
D. All of the above

10. Defibrillators should shock the victim:

A. 10 times
B. 100 times
C. 1-3 times
D. 50 times

Click here to see how you did and get your certification card!

Dedicated to Health

Dedicated to Health

People are our #1 priority.

Please share our website on social media and by email because our free online first aid and CPR courses save lives.

Quality Education

Quality Education

Thousands of people worldwide have learned first aid and CPR on our website.

If you need certification for work or want to help others, you're in the right place.